Wednesday, January 25, 2017
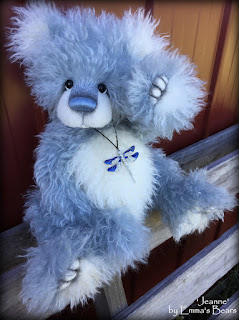
Jeanne
Another gorgeous custom ordered bear to share with you all today - this is 'Jeanne'. We made her using a piece of our 40mm curlylocks mohair hand-dyed in a soft lavender-grey colour, and paired with the original white (plus some white alpaca as well), to give this soft, fluffy look.
Jeanne has been adopted.
Tuesday, January 17, 2017
Tashi Panda
This little sweetheart is 'Tashi'. One of our latest commissioned bears. She was inspired by a bear we made using the same idea last year (the mix of different coloured mohair pieces of the same pile-type), but with slightly different fur pieces, a different face, nose, paws and accessories.
Tashi has been made using our 'Lyric' design, one of our most versatile patterns. Nearly every bear we make using this design of ours comes out differently! She has been adopted.
Monday, January 16, 2017
The nose progression of Toddler Sandie
We were working on this sweet girl today - another Toddler bear custom order. Her new mum chose this nice mid-brown for her nose colour, and we set to work embroidering it.
This is how we create our bear noses. Each artist has their own technique. Some use templates, some needle felt, some sculpt clay noses, some use leather, and I'm sure there are even more options I haven't thought of. But we (usually) give our bears embroidered noses. We start by trimming the nose area and laying down foundation stitches. These mark out the shape of the nose, and act like a guideline or template that wont get in the way. It's important to make these stitches TIGHT. You don't want them buckling up between the next layers of embroidery.
Then it's a matter of embroidering over and over and building up the shape and the 3D nose effect you desired for your bear. We will embroider one side, then try and get the other side symmetrical. If we're not happy, we just keep going.
Eventually we get a nose shape and size that works for the bear. Then it's a matter of adding some shading and finishing up the mouth.
Some ears will truely bring the bear to life - and then her head is ready to be attached to the rest of her.
Toddler Sandie's commissioning collector decided to adopt her as an undressed bear. We took some photos of her in a few different outfits (see below) to show how cute this design does look in baby clothing, but she is also stunning just 'in the fur' :)
She has been adopted.
Friday, January 13, 2017
Autumn Leif - the Baby Dragon
This fortnight we've been drawing up and cutting out the next 2 months worth of bears. So there hasn't been a lot to show for the hours of work put in. We decided it would be a good time to get one of our more unique projects completed though, to break up the repetitiveness of draw, cut, pin, repeat!
And so this little guy began to take shape. This is our Baby Dragon design, made using a piece of hand-dyed mohair we set aside around 18months ago (We have a whole new batch of hand-dyed rainbow mohair we've just added to the website too, if you wanted to see what was there for making your own dragon. I've been meaning to make a dragon using this pink cotton fabric in our store for nearly a year now too - I think the pattern would look just like little pink dragon scales!).
We paired the hand dyed mohair with a pair of handmade leather dragon wings we had custom made for this project about 16months ago, and some vintage-looking floral quilters cotton that tied all of the colours together.
We decided to give this dragon tiny horns (this was part of the original baby dragon concept, but our last dragons didn't have them), and hand-painted them to match the unique mustardy-green of the mohair.
And this was the end result. We called her 'Autumn Leif', and she has now found her new home. We do hope to have another dragon completed at some stage during 2017... we just can't say when! lol
Wednesday, January 4, 2017
Collaboration Bears - first for 2017
These little cuties are some Collaboration Bears we completed as our very first bears for 2017. We named them Baxter and Bahul. Both boys have since found their new homes :)
Subscribe to:
Posts (Atom)


